Sunday, 30 November 2014

Chris Clor


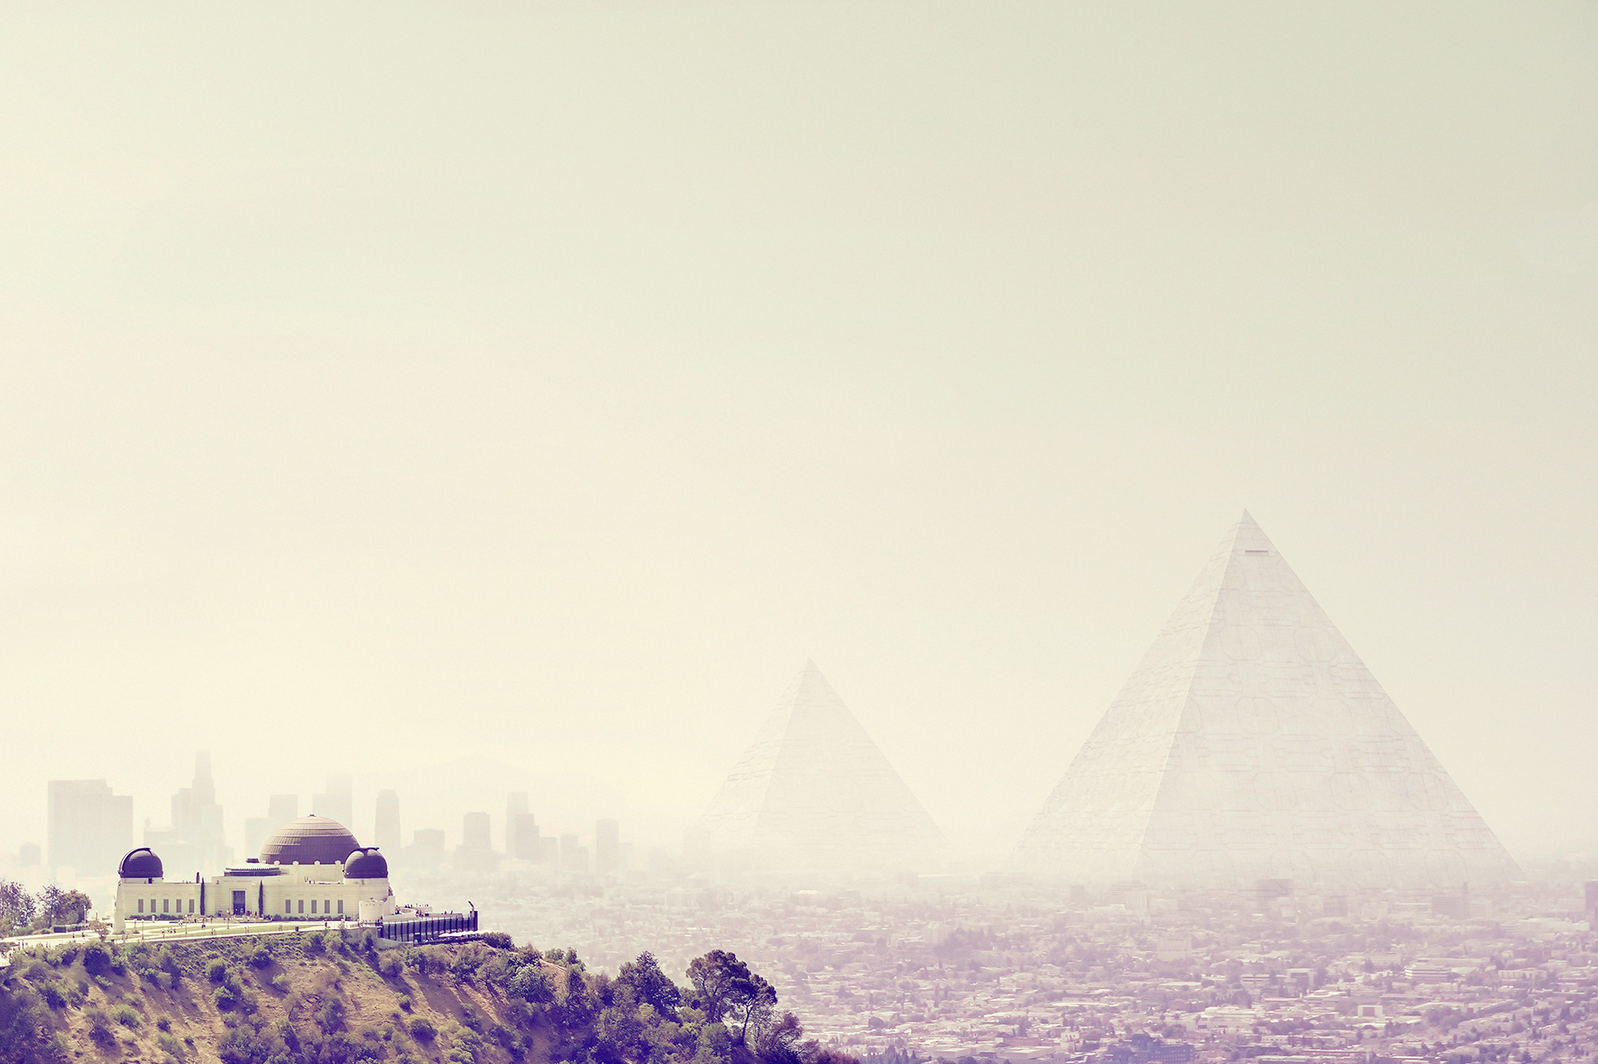
Chris Clor is a photographer and illustrator who utilises both the camera and CGI to create his work, he specialises in conceptual, portrait and product photography. This blending of different techniques results in Clor's unique and recognisable cinematic style.
Chlor has won several awards for his work including the Communication Arts award and One Eyeland Photographer of the year and so often has his work published in photographic press such as Digital Photographer, Adobe Layers and Capture to name but a few. As a result of his success Clor is sought after to speak at different schools and universities and other photographic associations.
Clor's usual clients include Shell Oil, Gillette and Ford Motor to name just a few of the larger names. Often Clor doesn't work just by himself, he has a team of producers, stylists and assistants to help complete his work, but he oversees all aspects personally. (Clor, C. 2014 [@http://www.clorimages.com/Asset.asp?AssetID=50414&AKey=KADJ6V2J])

I found Chris Clor's work while continuing my research on surreal landscapes. His work generated some ideas of creating ones on different contexts.
The first being; creating a surreal alien environment by mixing different architecture in environments where it just doesn't belong. These images below, by Clor, are what inspired this idea. The pyramid outside of a city casts a strange alien atmosphere across the entire image. It reminds me of different sci-fi films and tv series, all of which have to create this surreal alien environment by mixing props into locations they don't usually belong, playing with scale and perspective and other methods to create an atmosphere where the subjects look quite unworldly. This would be done simply by using forced perspective and different digital image composites.
Chris Clor
Chris Clor
Chris Clor
The second idea; quite simple and perhaps harder to accomplish, similar in some respects to the first idea, putting different animals into locations and environments they don't belong. The ideal and most effective way of doing this would be using CGI, but other methods would include getting wildlife shots at a zoo perhaps and they compositing them in. Obviously this would be harder to make believable because of matching lighting, perspective and other factors. But it doesn't have to be animals, I could use other props to a similar effect.
Chris Clor
Chris Clor
The third idea; this final idea is from these images below by Clor. It's simply putting things from a different time into the modern landscape. This could be a historic building in a modern environment or like the images, a person dressed as historical character in a modern place. This will give the images a timeless surreal atmosphere, but perhaps not quite what i'm looking for, depending on the degree as to how this is done will determine how surreal the images are. For example a historical building in a modern landscape might not seem that surreal, but a person dressed as historic character, like in these images, would seem quite surreal depending on certain factors as they could just look like a person dressed up, the images would need to look quite immersive which could be quite tricky.
Chris Clor
Chris Clor

Overall I find Clor's work quite inspiring, it has led to some insights and generated some ideas of where to take my current project making it seem more feasible in some ways.

Friday, 28 November 2014

Anaglyph step by step

Step by step guide of making a anaglyph
After finding a tutorial on Youtube on how to make a anaglyph I followed it using one of my own photos to see how hard it would to make one. And to see if it would be feasible to use them for this project. Below is the steps I took to create a anaglyph using the tutorial I posted before.

Step 1:
The first step was deciding what parts of the image I wanted to stand out and look 3D. Figure 1 shows what I wanted to make 3D marked in red.
Figure 1
Step 2:
Once you have decided on what to make 3D you need to make a selection of it. To do this I used the pen tool and created and saved a path of the front tree to start with, this was so I could come back or make alters to the selection if I needed to, also because the pen tool being one of the most accurate tools to make a selection with. Figure 2 shows a path being created around the foreground tree. Figure 3 shows me expanding the selection by a few pixels to ensure I've got all of the tree selected.
Figure 2
Figure 3
Step 3:
Once the selection has been made a copy of the selections content should be made onto a new layer. For sake of clarity, as this method involves creating a lot of layers, the layer should be labeled for reference, I named the layer foreground tree.
After this has been done go back to the previous layer with the selection on and go to Edit > Fill > Content aware. This fills the selection to make it look like the background, removing the tree. Don't worry if it doesn't match as the 3D tree will be put in its place so you won't be able to see the backdrop. See Figure 4.
Figure 4
Step 4:
Two further copies of the tree should then be made. Label the top layer Red and the second layer Cyan. Hide the original selection layer. Figure 5 shows these extra layers.
Double click the red layer to bring up the layer options. Deselect the green and blue channels, this will be the red layer. See figure 6.
Open the layer options like before on the cyan layer, deselect the red channel, this will be the cyan layer. See figure 7.
Figure 6 
Figure 7

Figure 8
Step 5:
To make the image 3D these two layers, the red and cyan, need to be off set. To do this you select the layer with the move tool and using the arrow buttons on your keyboard hit the left and right keys. This moves the layer 1 pixel per press. The red layer should be moved to the right and cyan layer to the left. Remember to move the layers equal distances. See Figure 8. The further apart the layers the greater the distance it will appear from the background.
See Figure 9 shows the anaglyph effect.
Figure 8
Figure 9

  • To make the image look more believable make the image up in layers in terms of foreground being off set the greatest distance. Then make another layer just behind it off setting slightly less, and so on until you reach the background which isn't off set at all.
  • Off set distances will be different for every image depending on size, subject matter ect. Experiment with distances to find the optimum, beware of the ghosting effect. 

Here are two examples of my experimentation with Anaglyphs. The first, the black and white image, has a much larger offset and is subject to the ghosting effect that can occur, where a double image appears.

The second image has a much more subtle effect as it was difficult to make the image look realistic because of the composition, i had to experiment with making the floor appear 3D as well so as the tree didn't appear to be just floating on nothing.


Sunday, 16 November 2014

Anaglyph Photoshop Tutorial


While searching for ways of creating anaglyphs I came across this Youtube video by Blue Lightning TV which demonstrates an excellent step by step guide on the method. My next step is to take some photographs and try applying the method to my own work. Experimentation to come in following posts. 


Mark Voce

Mark Voce is a photographer from Halifax, UK. He has had many solo and group exhibitions and has won several awards for his work, including Landscape Photographer of the year, Prix de la Photographie and APOY. As well as exhibited work he has also had his work publicized in magazines and newspapers, the publications have mainly been UK based but he has been recognised in Croatia and Poland as well with a couple of magazine publications.

Voce's style is to shoot black and white as well as using alternative processes such as platinum, cyanotype, salt printing and wet plate collodion to name but a few. I find Voce's work to be quite inspirational as it looks like he uses a similar method to my own work and creates a similar aesthetic to one I like to use myself, black and white long exposures to create ethereal timeless land and seascapes.

The long exposure gives the sense of timelessness, it creates an image we wouldn't be able to see without photography, and so the images get a sense of abstract and surrealism. It is this surreal aspect that I'am interested in for this project, creating a landscape that looks otherworldly, of sorts. Not so much that it looks supernatural or artificial, but so it looks different from what you would expect from a landscape snapshot. This long exposure aesthetic, however, is only effective on moving subjects, it works particularly well on cloudy skies and flowing water. It will be interesting to see how the aesthetic applies to stereograms and anaglyphs if I was to pursue that path.


Looking through the images it looks like the 3D effect would work really well with this fine art style, because of the nature of black and white photography, and because of the choice of subjects (the bridges, piers, ect) the photographs already focus on shape, form and depth, which hopefully will only be increased when turned into anaglyphs. To make anaglyphs requires splitting the colour layers of the image which does raise some concerns to the black and white images, hopefully it won't create any strange colour casts but there is only one way to find out, experiment. 

Mark Voce

Mark Voce

Mark Voce

Mark Voce

Mark Voce


Thursday, 6 November 2014

Further Research and inspiration

As I was looking into using forests and woods with misty/ foggy weather as a setting for some of my photographs with this project, I recollected films, tv series and other media products that used a similar environment and atmosphere and most had one thing in common. That they were all part of the horror genre. This got me thinking along those lines, and while looking on the net at stills from films and even games, I found that these were very similar to what I am looking for. The aesthetic that is, not the supernatural, horror scene. 


Below are a couple of images from the Sleepy Hollow set. The images demonstrate the misty wood atmosphere I'm looking for, and so have given me a new direction to take my research for this project. 

Unknown Photographer

Unknown Photographer

As I wanted landscapes with eye catching features and was already looking at horror film sets, this lead to further ideas for my project.
Originally I was looking for something surreal to put in the images, but while looking at the Sleepy Hollow set it got me thinking of a a horror game called Slender. A game set in a wood in the middle of the night, similar in some respects to the misty scenes as night will mask the background just like the fog, I felt this could be quite inspiring for my project as It gives another method to create the atmosphere I'm looking for, one perhaps more achievable and in some cases can be more relatable.

The images below are by unknown photographers also inspired by Slender. 


Unknown Photographer

Unknown Photographer


As you can see in the two images above, they look like ordinary images of a wood. But looking closely you can see that is not quite the case. This is similar to what I want to create, an ordinary landscape at first glance, but at closer inspection, there is something else going on. Here the something else going on is the character from Slender lurking in the woods, this is similar to what I want to make but maybe not quite so dark and sinister as to be defined as horror, my ideas are somewhat less supernatural. 

This next image below are more items related to the game mentioned above. They are notes scatted around the in game level that the player finds. Adding to the ideas above I could place items or notes in the image that give a story to the photograph, giving the sense of mystery. Making it appear like everything is not as it seems.


Following on from the horror theme, I found this link with one of the images I used above. It shows how adding some text, a narrative to the image can make it that much more effective. Just a thought for my project if the images don't quite tell the story I'm looking for or don't have the desired effect. 
The text along with the image can really set the atmosphere and can aid with the narrative making the image stronger . 


Monday, 3 November 2014

Draft Proposal

Draft Proposal

Your idea and subject area:
This will be a landscape based project with a surreal twist. I will be looking to create a set of landscapes that each have something unusual about them. This will either be objects that don't belong in a setting, objects of unusual size or something similar that makes the landscape look a bit different. I will be looking to make the effect fairly subtle so that a viewer just glancing at the image would see an ordinary landscape, but something would be there that caught the eye and draws the viewer in for a closer look, to check what they are seeing. I already have a general aesthetic in mind for the project, one that is much inspired by Martin Vloch's work. It will be black and white, high contrast with a gritty feel.
I will be looking into forced perspective photography and digital composites to create the surreal images.
I have also considered stereograms and 3D image techniques to display the images as this will add the unusualness and add to the effect.

Research methodology:
I will be looking at past and current landscape and surreal photographers and artists as well as digital artists. Websites will be the majority of the research, but I will also be looking out for gallery work and any books that contain relevant work.
For the 3D imaging I will be researching and hopefully testing different methods to see if it will be feasible for what I want to produce.

How do you plan to realise the project:
I will be researching to start with to get an idea of the images I want to produce, I will then be searching for suitable locations and do some test shoots on location to see of they will work for what I want to produce. I will also be testing different 3d imaging techniques to see if they will work.

Timescales/production plan:

Research / Test shoots, Location scouts, method tests / further shoots / Editing / prints

The above is my general plan, but I will be looking to do whatever I can when I can.

Intended audience and output:

As its a fine art based project my output will be a few high quality prints. Intended audience is people interested in surreal/landscape work. 

Stereograms and 3D images

As mentioned before I have been looking into alternative ways to present the final images, and have been looking into stereoscopes and other methods of producing 3D looking images. I found this link that explains the processes quite well and shows different methods of creating 3D images, from multiple lens cameras, stereograms, to the digital method of changing the aligment of the colour layers and viewing the images through special glasses. Here's the link to explain things better.


TheArt of Stereo Photography – Bob Manekshaw (www.photostuff.co.uk) 


I will be looking into these methods in more detail and hopefully soon I will be able to post some of my own experimentation with the techniques. 


Sunday, 2 November 2014

George Christakis

George Christakis is a Greek digital artist/photographer. He explains on his website that he creates his images using digital techniques, and that his work is either surreal, conceptual or 'just landscapes with a bit of craziness', Christakis also explains that a lot of his inspiration comes from music. His website can be seen by following this link.

Christakis' landscapes are what attracted me to his work, its so different to other photographers I have been looking at. A lot of his work is quite surreal and thats what caught my eye, especially as my current project will be looking into surrealism and surrounding genres. Some of the landscapes, at first glance, look quite ordinary, but looking closely you can see that some things just aren’t right, whether its the colours in the sky, the scale of objects in the environment, or just something out of place, theres always something that is amiss, creating that surreal feeling about them. This is what interested me about the work, because with my project I wanted to create something similar in some respects, landscapes that contained something out of place, an anomaly, something that catches your eye in passing that draws you in for a closer look.
Christakis' landscapes look too cinematic to be photography alone, you can see the digital work that has gone into them even in the more realistic images, again this is something i'm looking to incorporate in my images because photography alone won't create the images I'm looking to produce. There needs to be something that creates the surreal atmosphere and the cleanest way would be digital manipulation. I find Christakis's work to be quite inspiring, what he does he does well.

A few examples of his work can be seen below.


George Christakis

George Christakis

George Christakis

George Christakis
As shown in the few examples above, the images contain different degrees of surrealism. Some of the images are more subtle than others, some are blatantly digitally produced such as the floating island and plane in a desert. While others are more photographically orientated with playing with long exposure and composites to create that surreal atmosphere, these are the images I'm more interested in as they relate to the work I want to produce for this project.